 Greg Kogan
How to Capture Leads with Resource Landing Pages and WordPress

If you’re like any of my clients, you need to generate high-quality leads to fill your sales pipeline and grow your company. You can spend money on contact lists and outbound sales teams, or you can sit back while the leads come to you.
How? With resource landing pages and your WordPress site.
In this in-depth guide, I’ll show you how to set up an effective, low-cost, and scalable lead-generation machine using WordPress and just a bit of setup time.
It’s the same process I’ve set up for my clients to get more leads, so I know it works.
What you’ll learn:
- What's a Resource Landing Page
- Why Make Resource Landing Pages in WordPress?
- How It Works (the Framework)
- Setup Instructions
What's a Resource Landing Page
A resource landing page is a page on your site that offers a useful resource to your visitors, such as a whitepaper, video, report, or guide. In exchange for the free resource, the visitor must submit their contact information.
The benefit for visitors is free access to a valuable resource that can help them and their company.
The benefit for companies—the reason to give away the resource for free—is collecting leads; contact information of people who fit their target audience and may benefit from their product or service.
Once the contact information is received—ie, a lead is captured—the company can follow up with the individual to learn about their use case and offer a demonstration of their product or service.
Resource landing pages not only help convert website visitors into leads, they can also help companies get more value out of advertising campaigns compared to advertising a product or service directly.
Why Make Resource Landing Pages in WordPress?
Save Money
Standalone landing page tools like Leadpages and unbounce start at $300 per year. The cost of marketing platforms with landing-page builders can reach many times that. Form builders like Formstack and Typeform are another $300+ per year for a service you can do without.
By creating and managing your own landing pages on WordPress, you can cut those overhead costs and use the money you save to bring more people to the resources through advertising.
Keep Full Control
Keep full control over the content, forms, styles, tracking, and behavior on your resource pages. You will have full control over what happens to the lead and how the resource is delivered to the individual.
Scalability
Scale your marketing to get more leads or spend less money, as needed. Landing page services, marketing platforms, and form builders restrict the number of visitors, form submissions, or pages you can have. That is, unless you upgrade to a more expensive plan to lift those restrictions.
Easy to Use
It’s easy for your team to start and continue using. It’s in the same system and format (WordPress) you—or your marketers and developers—are comfortable with already.
Adding landing pages for additional resources is as simple as adding a new post or page. There is a bit of setup work in the beginning, but it’s easy to get through.
How It Works (the Framework)
This lead-generating system is made up of the following parts:
Page Template
By taking advantage of WordPress templates for your resource pages you will save time on:
- Copy-and-pasting the HTML each time to embed the image and resource file.
- Fixing things if something was broken when editing the HTML.
- Teaching others to repeat the process.
- Fixing things when someone else breaks it.
In other words, using WordPress page templates will make this easy to do and to replicate.
Inside the template is a simple HTML form, and a few lines of JavaScript to react when the form is submitted. There are examples of both in the step-by-step instructions that follow.
The information you collect with the form is up to you. At a minimum, I suggest asking for the following:
- First Name
- Last Name
- Company
Additionally, there will be two hidden fields in the form for the resource name and resource URL, so that they can be captured along with the contact details.
Zapier
Zapier is a service that lets you automate actions across multiple services and tools. In this case, we’ll set it up to listen for new form submissions from the resource landing page, send an email to the person who submitted the form, and send us an alert.
Using Zapier, you can also send the contact to your CRM, alert your sales team, and much more.
Resource
This is the item you’re offering in exchange for contact details, such as a PDF or a video.
Resource Landing Page(s)
This is the public page that visitors will see. It describes the resource, its value, and gives a hint of what’s inside. You can make it look any way you want, but simpler pages—where the next step is obvious to the visitor—tend to convert more visitors into leads.
Setup Instructions
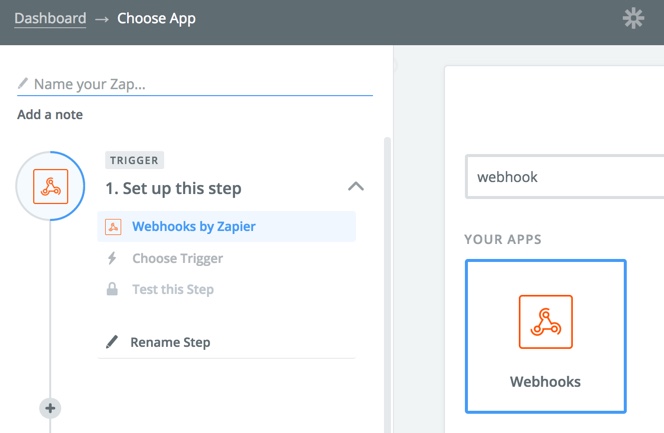
Step 1: Create a Zapier Webhook
In this step we will set up an automation that will receive incoming form submissions and do something with them. In other words, it’s a webhook.
Create a Zapier account if you don’t have one.
Create a new automation (“Zap”) with a “Zapier Webhook” trigger.
Choose “Catch Hook” to set the webhook to listen for new submissions.
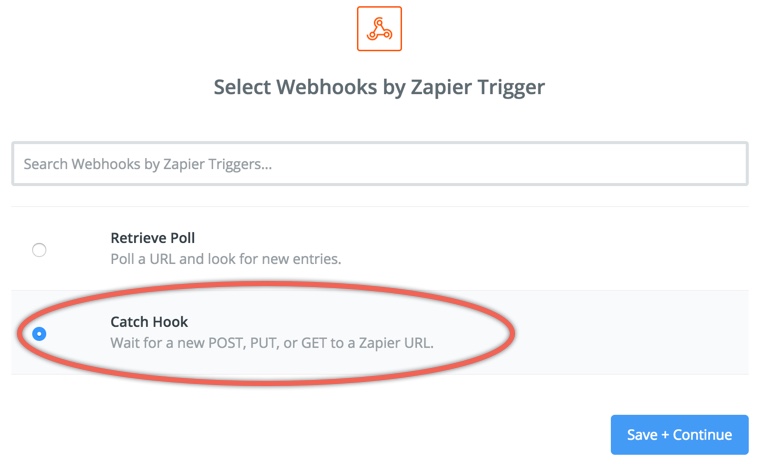
Click “Continue” a few times until you see the webhook URL. It should look something like this:
https://hooks.zapier.com/hooks/catch/642291/tlvd8h/
Copy the webhook URL for the next step and save the “Zap.” (Skip the test, if asked.)
Step 2: Prepare a Page Template
Create or download a simple template for your resource landing page. To keep things simple, you can copy and modify your current theme’s page template.
Your template should include PHP functions to display four dynamic elements:
- Page title:
<?php get_the_title(); ?> - Page content:
<?php the_content(); ?> - Featured image (optional):
<?php if(has_post_thumbnail()) {the_post_thumbnail();} ?> - Resource URL (more details on this shortly):
<?php echo get_post_meta(get_the_ID(),"resource_url",true); ?>
Note that Resource URL is a custom field. See documentation on displaying custom fields and on post thumbnails.
Form HTML
You can create your own form or use the unstyled example below.
<form id="resource-form" action="YOUR-ZAPIER-WEBHOOK-URL" enctype="text/plain" method="get" target="receiveForm">
    <div>
        <input type="text" name="firstName" placeholder="First Name" required>
    </div>
    <div>
        <input type="text" name="lastName" placeholder="Last Name" required>
    </div>
    <div>
        <input type="email" name="email" placeholder="Email" required>
    </div>
    <div>
        <input type="text" name="company" placeholder="Company" required>
    </div>
    <input type="hidden" name="resourceUrl" value="<?php echo get_post_meta(get_the_ID(),"resource_url",true); ?>">
    <input type="hidden" name="resourceTitle" value="<?php echo get_the_title(); ?>">
    <input type="submit" value="Send Me the Resource">
</form>
<iframe style="display:none;visibility:hidden;" name="receiveForm" height="1px" width="1px"></iframe>
Replace YOUR-ZAPIER-WEBHOOK-URL with the full URL of the webhook you created in step 1. That’s what tells the form to send the submitted data to Zapier.
In addition to sending the data to Zapier, we can display a confirmation message to the visitor and track the submission as an event or conversion in your analytics tool(s). That’s possible with a bit of JavaScript…
Form Script
Add the following code anywhere in the template after the form:
<script>
  jQuery(document).ready(function($){

    // Wait for the form to be submitted
    $("#resource-form").submit(function(){

      // Optional: Track the form submission in analytics

      // Replace the form with a thank-you message
      $("#resource-form").replaceWith("<p>Thanks, now check your email!</p>");
    });
  });
</script>
Optional: Track the resource form submission or include a conversion tracking code. For example, here’s an event tracker for Segment:
analytics.track('Submit Resource Form', {
  'category': 'Resource',
  'label':'<?php echo get_the_title(); ?>'
});
To track the event in Google Analytics, include the following custom event:
ga('send', 'event', 'Submit Resource Form', 'Resource', '<?php echo get_the_title(); ?>');
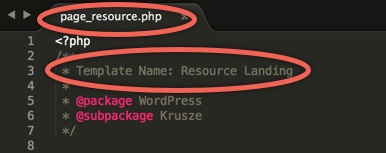
Name and Save the Template
Save the template in your WordPress themes directory as page_resource.php. The name you specify in the “Template Name:” comment is what you will see in the “Template” dropdown on the page editing screen under “Page Attributes.” See documentation for page templates and filenames.
Step 3: Upload the Resource
Use the WordPress media upload feature to upload the resource file you will be offering to visitors. Once it’s uploaded, copy down its URL.
See documentation for uploading files to WordPress if you’re not sure how to do this.
Step 4: Create and Publish the Page
Parent Page
Create a page simply called Resources. This will act as the parent page for all your individual resource pages. In the future it can act as an archive or library of all the available resources, but for now it helps keep things organized and under the /resources/ URL.
Page Contents
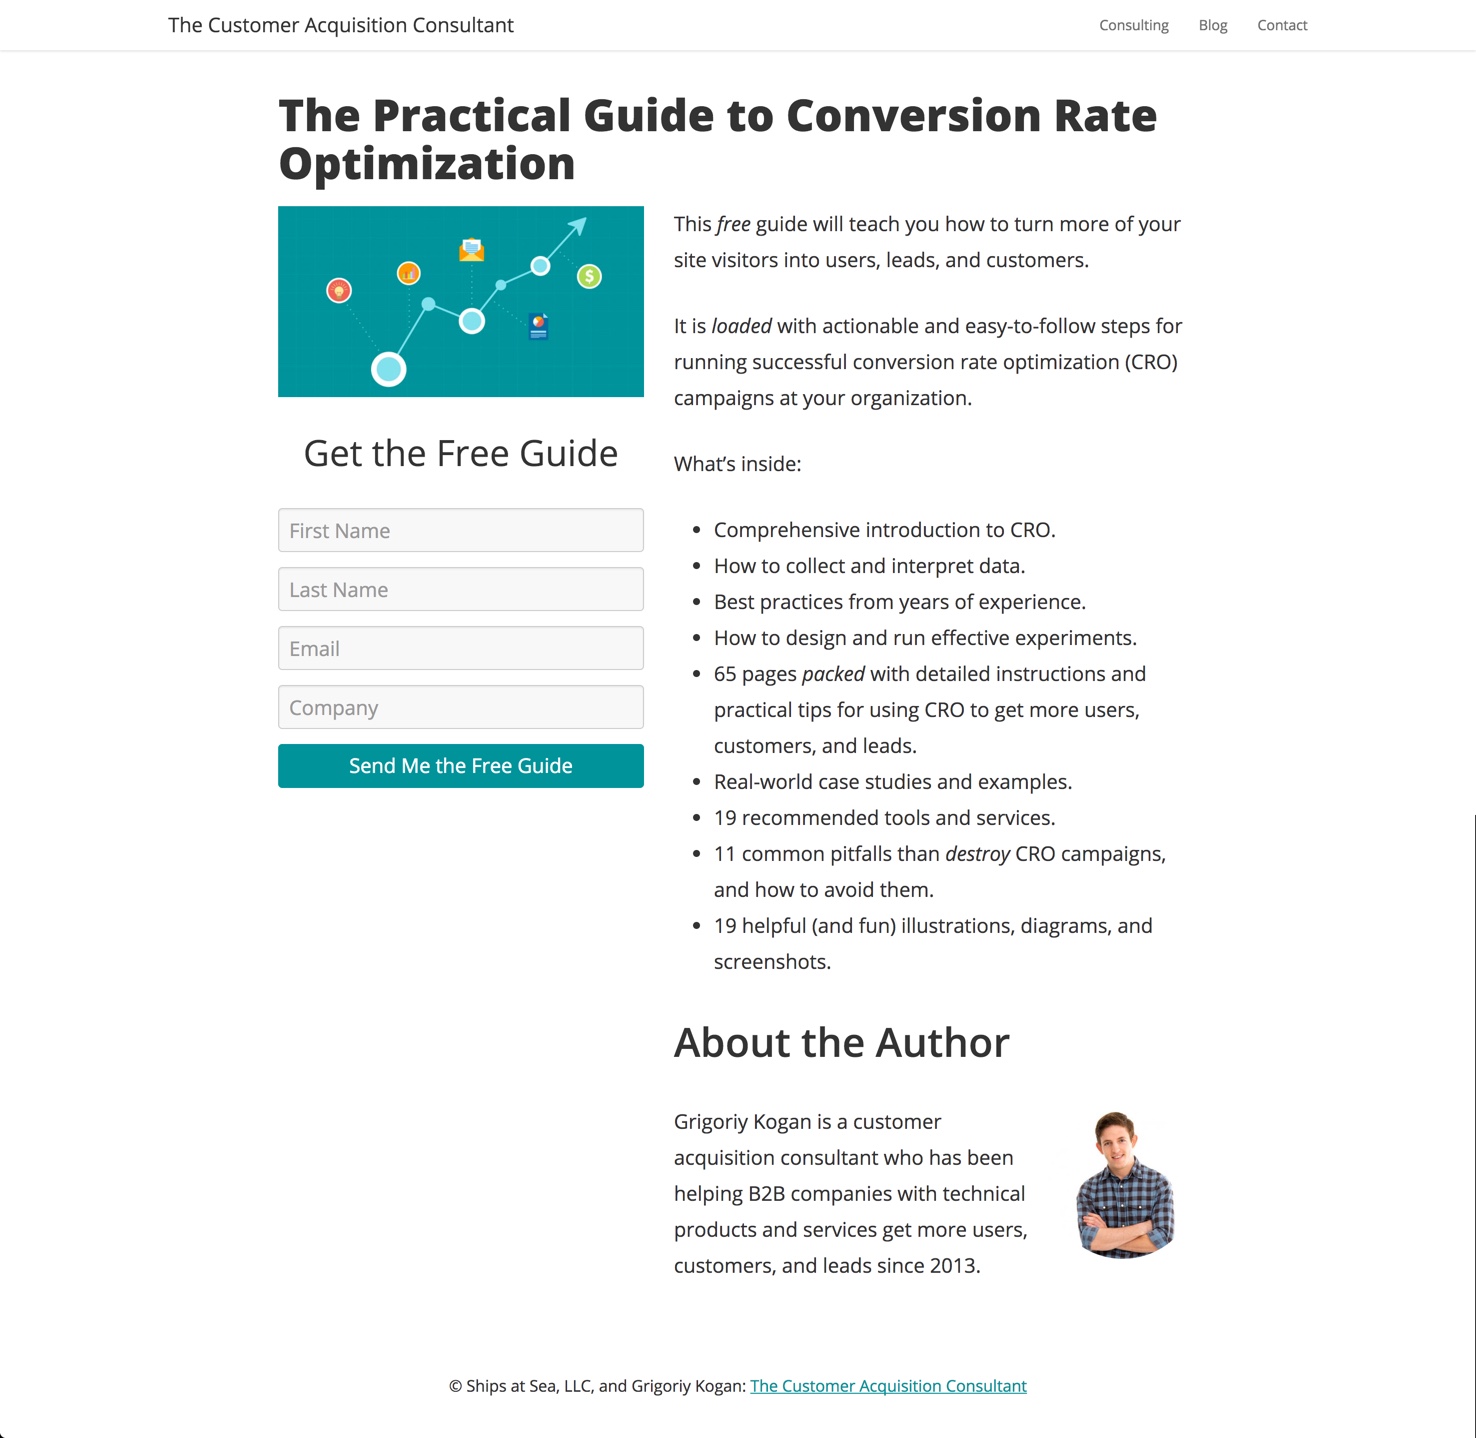
In the body of the page, add your resource description and anything else that will make the resource appealing. I recommend having a brief and enticing description, a short table of contents, and something about the author. The objective is to make people interested enough to submit the form to get the full resource.
This content will show wherever you included <?php the_content(); ?> in your template.
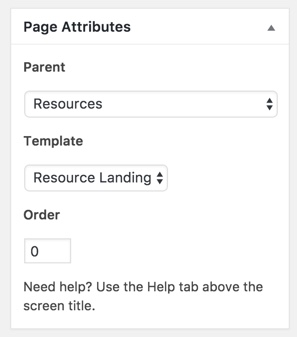
Page Attributes
Create your new resource page and set its parent to Resources and template to Resource Landing (or whatever you named your template in the previous step).
Optional: Set a featured image for the resource. For example, it can be the cover image of the PDF, or a thumbnail of the video, or just an abstract illustration to set it apart from other resources. The image will display wherever you have <?php if(has_post_thumbnail()) {the_post_thumbnail();} ?> in your template.
Specify the Resource URL
Now we need to specify the location (URL) of the resource so that it can be included in the form—and thus sent to Zapier along with the contact details—as a hidden field.
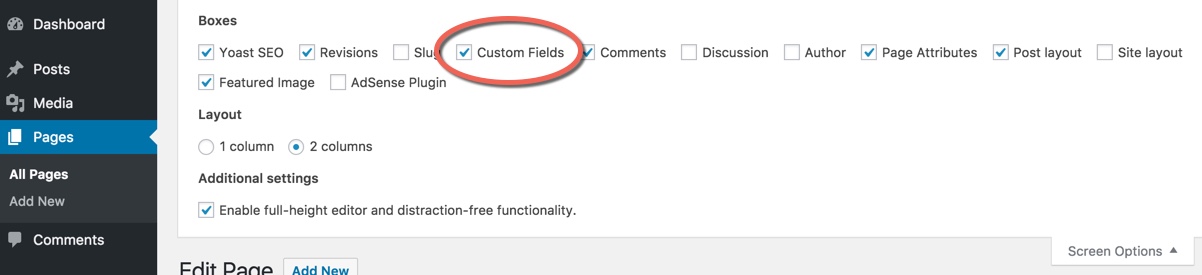
We can do this by adding a custom field to the resource page in WordPress.
If you do not see a “Custom Fields” box on your page editing screen, then it may be hidden. To unhide it, click “Screen Options” and check “Custom Fields.”
Add a new custom field with the name resource_url, and enter the full URL of your resource into the Value field.
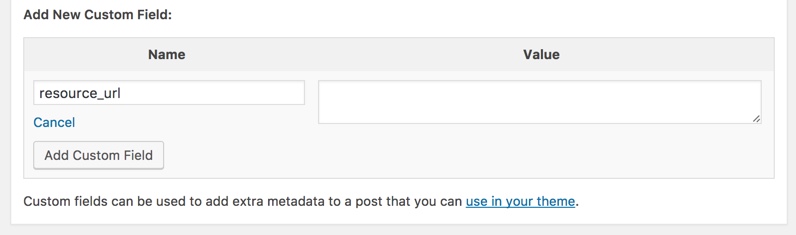
This URL will be placed into your template wherever you included <?php echo get_post_meta(get_the_ID(),"resource_url",true); ?>.
(See documentation for using and creating custom fields.)
Publish and Make a Test Submission
Publish the page and make a test form submission. All that happens now is the form data gets sent to Zapier. In the next and final step, we will configure the Zapier automation to send a link to the resource to the lead, and do anything else we want.
Step 5: Set Up Automation
In Zapier, open your Zap and test the Webhook step.
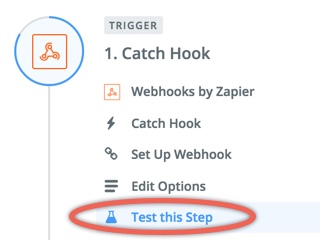
You should see your test form submission. If you don’t, submit another test form on your resource page or troubleshoot the form.
Create an action step with Email by Zapier. Set the To: address to be the submitter’s email, and include a link to the resource (Resource URL dynamic field) somewhere in the email body.
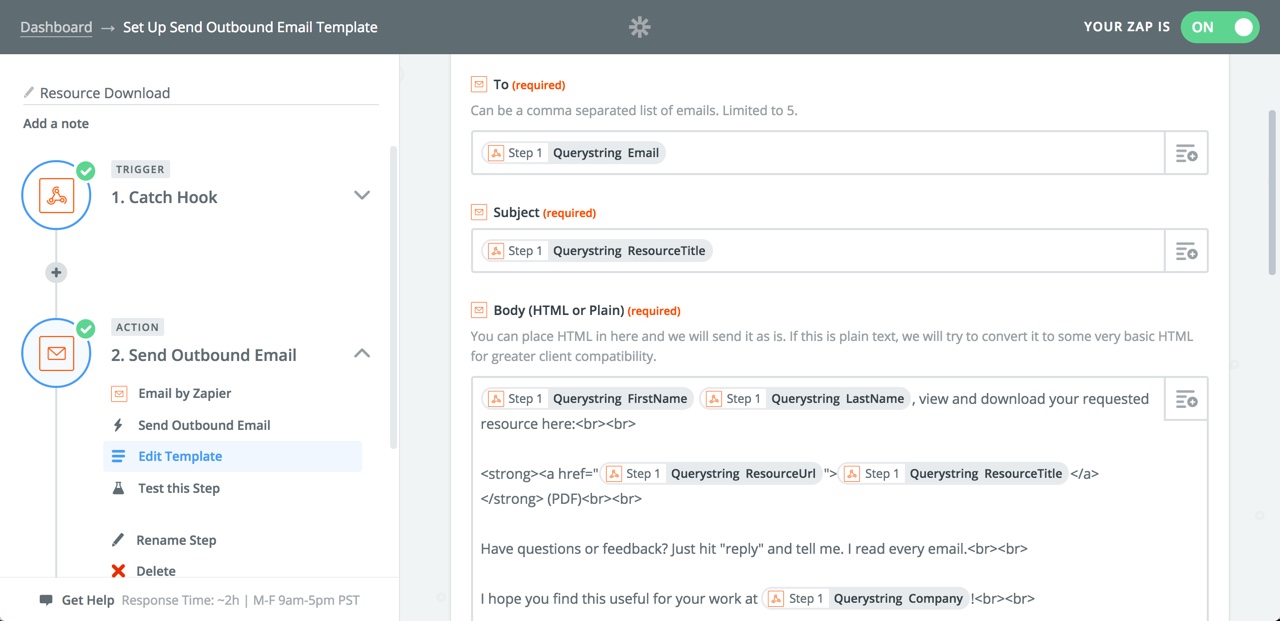
The Resource URL is the value passed from the form’s hidden field, which in turn is the value entered into the resource_url custom field on the WordPress page.
Save the Zap and test the form again. This time you should receive the automated email from Zapier. Check that the resource link works.
Finally, you can add optional steps in the Zap such as adding the lead to your CRM, sending a Slack notification, or creating a draft follow-up email in your Gmail account.
You are now ready to share and promote your resource page with your target audience and start collecting leads. Try promoting resources on platforms such as LinkedIn to generate targeted leads. If it goes well, you can create more resource pages without having to edit code, waste time, or send manual emails.
Leave a comment below or tell me how it goes for you!
◼
PS - Liked this article? I write one every month or so, covering lessons learned on B2B startup growth. Don't miss the next one:
If you need help with marketing and revenue growth, get in touch.